新規作成④からの続きをしていきます。
https://kazunaka.com/react-redux-memoapp-four/
一件の取得ができるところまでいきたいと思います。
ファイルを編集
ディレクトリ「src」以下のファイルを編集していきます。
*コードの重複部分もありますが、どこに記載していいかを分かりやすくしたくて
重複部分を書いているので、全部コピペでは完成はできないです。ご注意ください。
actions/index.jsを編集していきます。
まずは「// アクション定義」に一行追記します。
export const READ_MEMO = 'READ_MEMO';以下のコードを一覧取得のgetMemosの関数の終わりの後に追記します。
// 一件取得
export const getMemo = (id) => ({
	type : READ_MEMO,
	params : id,
})続いてreducers/memo.jsを編集していきます。
まずはimportを編集して、READ_MEMO,を追記します。
import {
	READ_MEMOS,
	READ_MEMO,
	ADD_MEMO,
} from '../actions';続けて、switch文を編集します。
case READ_MEMOのケース文を追記します。
	switch (action.type) {
		case READ_MEMOS:
			return memos;
		case READ_MEMO:
			return memos;
次にindex.jsを編集します。こちらもimportを追記します。
import MemoShow from './components/memoShow';Switchの文に「<Route ~~{MemoShow} />」を追記します。
			<Switch>
				<Route path="/new" component={MemoNew} />
				<Route path="/show/:id" component={MemoShow} />
				<Route exact path="/" component={MemoIndex}/>
</Switch>続いてcomponents/memoShow.jsの編集です。
import React, { Component } from 'react';
import { connect } from 'react-redux';
import { Field, reduxForm } from 'redux-form';
import { Link } from 'react-router-dom';

import { getMemo } from '../actions';

class memoShow extends Component {

	componentDidMount() {
		const {id} = this.props.match.params;
		if (id) this.props.getMemo(id);
	}

	renderField = (field) => {
		const {input, label, type, meta : {touched, error}} = field;
		return (
			<div>
				<input {...input} placeholder={label} type={type} />
				{touched && error && <span>{error}</span>}
			</div>
		);
	}

	onSubmit = (values) => {
		const {id} = this.props.match.params;
		this.props.history.push('/');
	}

	render() {
		const {handleSubmit, pristine, submitting, invalid} = this.props;
		console.log(submitting);
		return (
			<form onSubmit={handleSubmit(this.onSubmit)}>
				<div><Field label="タイトル" name="title" type="text" component={this.renderField} /></div>
				<div><Field label="メモ" name="memo" type="text" component={this.renderField} /></div>
				<div>
					<Link to="/">キャンセル</Link>
				</div>
			</form>
		);
	}
}

const validate = values => {
	const errors = {};
	if (!values.title) errors.title = 'タイトルが入力されていません。';
	if (!values.memo) errors.memo = 'メモを入力してください。';
	return errors;
}

const mapStateToProps = (state, ownProps) => {
	const memo = state.memos[ownProps.match.params.id];
	return { initialValues : memo }
};

const mapDispatchToProps = ({ getMemo });

export default connect(mapStateToProps, mapDispatchToProps)(
	reduxForm({validate, form: 'memoShowForm', enableReinitialize: true})(memoShow)
);
アプリを実行
コマンドでアプリを実行しましょう。
$ yarn startエラーなく動くと新規にメモを作成して、
そのメモを押して見ましょう!
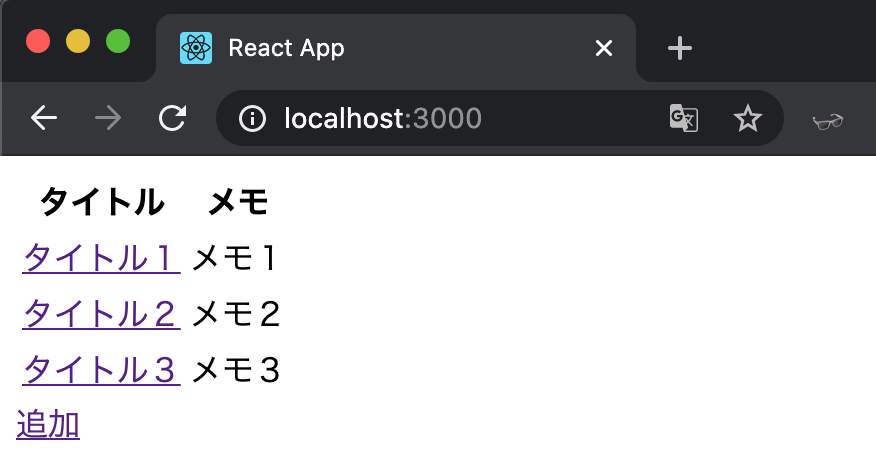
「タイトル1」を押すとページ移動ができると思います。
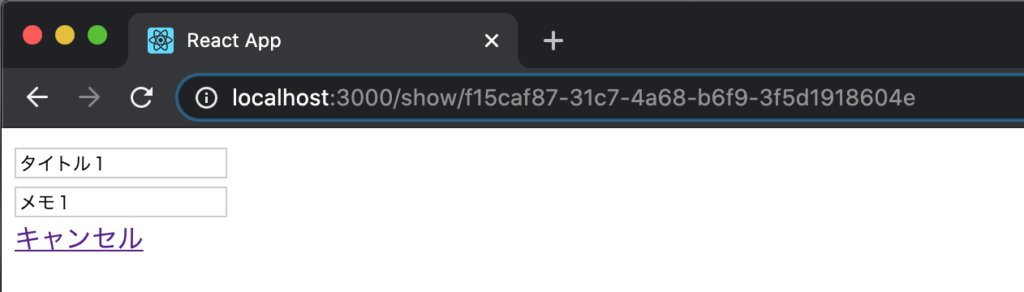
ページ移動ができて、タイトルとメモが無事に反映されていたら成功です。
次は編集ができるようにしていきたいと思います。
https://kazunaka.com/react-redux-memoapp-six/


コメント